About ubuntu server 20.04 LTS
One of the biggest improvements brought by Ubuntu Server 20.04 LTS is enhanced security and stability.Ubuntu Server 20.04 LTS with enterprise-class stability, resiliency and even better security.In this blog, I will walk you through new features that have been introduced as part of the 20.04 LTS release. These include updates to the Ubuntu Server Live Installer, new Ubuntu Server Guide, Ubuntu Pro images and more. We will also be covering what’s new in Ubuntu Server 20.04 LTS in a webinar on April 29th for which you can register now.
Install Ubuntu Server 20.04 LTS
Requirements
You’ll need to consider the following before starting the installation:
- Ensure you have at least 2GB of free storage space.
- Have access to either a DVD or a USB flash drive containing the version of Ubuntu Server you want to install.
- If you’re going to install Ubuntu Server alongside data you wish to keep, ensure you have a recent backup.
Step 1: Download iso
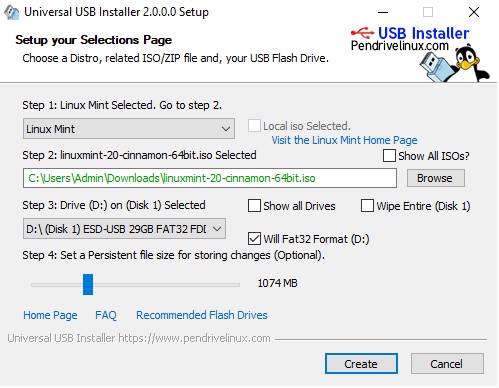
- ISO image of Ubuntu server 18.04 LTS You can download the ISO from this link
- Once you have downloaded the Ubuntu server ISO, you need a tool to write the image to a disk. I recommend using a free tool called Universal USB Installer in Windows:
Step 2: Create a live USB or disk
Use Universal USB create usb installer Ubuntu server.
Step 3. Select Keyboard Layout
Choose the Language. Next, select the preferred keyboard layout and hit ‘ENTER.’


Step 4. Select Ubuntu or MAAS (Metal As A Service)
You will then have a list of various platforms to install Ubuntu. Select the first choice to install Ubuntu generally on a PC. The other two options, titled ‘Install MAAS’, facilitate cloud provisioning for physical servers.
Since we are doing the installation on a PC, we select the first choice and hit ENTER.
Step 5. Proxy Settings
The next screen will prompt for your proxy server address. If none is available, proceed and Hit ENTER to move to the next step

Step 6. Select network mirror
Next, you will be asked to enter the address of the network mirror.
Leave the default mirror selected, unless you want to change it to some other address you prefer.

Step 7. Hard Disk Setup
This step prompts you to configure your hard disk as per your usage of the disc during the installation process.
You have the freedom to use the entire disk if no other operating system is installed or you can opt to configure manually and make a few changes

Step 8. Choose a hard drive to install to
Next, select the hard disk you are going to install Ubuntu server 18.04 on. In this case, I’m using VirtualBox to install Ubuntu server 18.04.
If you have multiple hard drives, they will be listed for you to select.

Step 9. File System Summary
Now you can verify if everything is OK and click done.
If you noticed that you made a mistake and need to make further adjustments, hit ‘BACK.’
If you wish to start all over with the disk setup and partitioning, hit ‘RESET.’
Step 10. Confirm Changes
To confirm changes made to the hard disk, hit ‘CONTINUE.’ This action will mark the beginning of the installation process.

Step 11. Provide User Login credentials
Provide the necessary login credentials and hit ‘DONE.’
Step 12. Select Server snaps
This is a new step in the installation of Ubuntu Server. This step allows you to choose from a list of selected Server Snaps. What this means is that you can choose to have a pre-configured server.
Some of the choices include
- Kubernetes
- Docker
- Next cloud
- Canonical Live patch
Select your preferred option, or if you do not wish to have any of them, hit ENTER.
The installation process will begin. This will take about 10 minutes, although it could vary depending on the RAM and CPU of your server.
Step 13. Complete the Installation
Finally, the installation will wrap up, and you will be prompted to reboot your server! Hit ‘REBOOT’ and remove the installation media. VirtualBox will automatically do this for you.